
All of our puppet patterns were initially made for adult performers. This finished size often ends up being too big for children. However, you can reduce the pattern to fit a smaller hand.
How Long is a Puppet Made from Your Pattern?
Quite a few of our customers ask about the size of the puppets made from our hand puppet sewing patterns. The finished size is about 14″ long. Depending on the length of a person’s arm the bottom of the puppet will end up about 2 1/2″ below the elbow on a short person. I’m short – I’m 5’2″. For a taller person, the bottom will be about 5″ below the elbow. My husband is 5’11” and the full size puppet stops about 5″ below his elbow.

If you want a longer puppet, just add the length to the bottom of the front and back pattern pieces.
How Big is the Puppet’s Mouth Made From Your Pattern?
The mouth of a full size (100%) puppet is large enough for adult and older children’s hands. My husband has large hands and he’s got plenty of room. My hands which are normal sized fit perfectly also. Kids age 4-5 can use and work the mouth of this size puppet but it is sloppy on their hands. This size works well for kids in first grade and up.
How to Reduce the Pattern to 65%?
The puppet reduced to 65% is too small for my hands. I can only get two fingers in the mouth. This puppet size is perfect for 3 year olds.
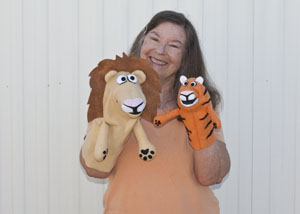
A puppet this size is just too adorable! I thought it would be hard to sew on the sewing machine, since a lot of the smaller detail pieces were teeny tiny. In fact, I started to baste the tiger together before I used the machine. That got tedious after the first two seams so I threw caution to the wind and just used pins. I was so surprised at how easy it was to sew the mouth together. The lion has more pieces for the mouth than most of our patterns. For a really beginner sewist, I wouldn’t recommend starting out making a puppet this small. I would only reduce the pattern to 85% for my maiden puppet sewing project until you got the hang of it.
I also thought it would take longer to make because of fiddling with the small pieces on the sewing machine. My sewing time was almost cut in half. I came to the conclusion that since the puppet was almost half the size as one of my full size puppets it would take about half of the time to sew since the seams were shorter.
Reducing the Pattern to 80-85%
For kids 4-5 reducing the pattern to 80-85% would work. Even a 3 year old could operate it. It is a snug fit for my hands. Hubby can’t get his hand in.


Optically there isn’t much difference between the 65% and 80% reduced puppets. My suggestion is to reduce the pattern around 80-85% if you want the puppet to fit preschoolers. That size will give them room to grow. I definitely wouldn’t go below 65%. The pattern pieces would end up being teeny tiny.
How Do I Change Scale When Printing?
Before you print the pattern, double check settings on your printer. Make sure page scaling of pdf print is set to none or 100% for printing the pattern at 100%. Every printer is different. The page scaling determines the size of pattern pieces.
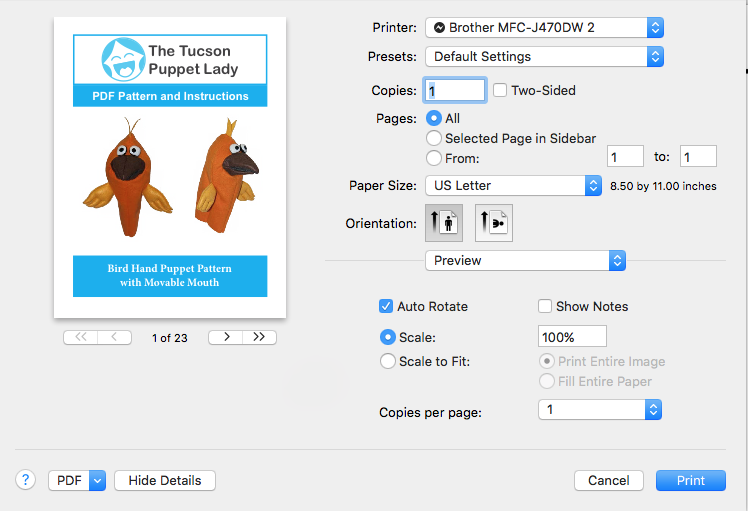
This is what my printing instructions look like. About half way down on the right side is where I can select what size I want printed. If I want full size, then I type in 100%. If I want to make pattern smaller, then I type the size I want. In this case, it would be 80% to make the puppet for preschoolers.
How Do I Save Paper?
Instead of printing out the whole pattern and instructions, we recommend that you print only the pattern to save paper. You can either read the instructions on a device or watch our Youtube tutorial to see how the sew the puppet. On my computer printing instructions, I can select what page range I want printed. That setting is located about 1/4 of the way down on the right hand side on the above photo. Under “Pages” and “From 1 to 1.” Just change “1 to 1” to the pattern page numbers.
Now that you’ve decided what size to make your puppet it’s time to go shopping for your pattern. Did you want to make an animal or person?